
Help & Guides
A little guidance.
A simpler working day.
Search our resource library for straightforward how-to guides from Customer First Business Solutions Ltd. Tell us what you need help with below.
Resource library
Search results.
Select a matching resource to read the instructions.
No matching resources yet.
Try a shorter phrase such as “Outlook”, “hold a call” or “invoice”, or clear your search to browse the library.
Recover deleted items in Outlook
Accidentally deleted an email? Follow our guide for new Outlook, Outlook in a browser or classic Outlook for Windows, with links to Microsoft’s official instructions.
Read the Outlook recovery guide →Hold, transfer and retrieve calls
Clear instructions for Yealink desk phones and cordless handsets: pause and resume a call, transfer directly or speak to a colleague first.
Read the Yealink call handling guide →Internet & connectivity · Picture guide · 5 minute readIs my internet router online? Check the ONT and router lights
Start with the incoming connection, then check the router and a connected device. The examples below show an Openreach ONT, a TP-Link Archer VR2800 and a UniFi Security Gateway Pro (USG-PRO-4). Match the model and labels on your equipment.
Not every light should be on. A healthy ONT normally has its LOS warning light off. Unused ports and disabled Wi-Fi bands can also have unlit indicators.
Which connection do you have?
Full fibre uses the powered ONT on the wall. A DSL service uses a telephone-line modem; its DSL or sync light matters instead. Some installations have a separate modem feeding a router.
1. Full fibre: check the Openreach ONT
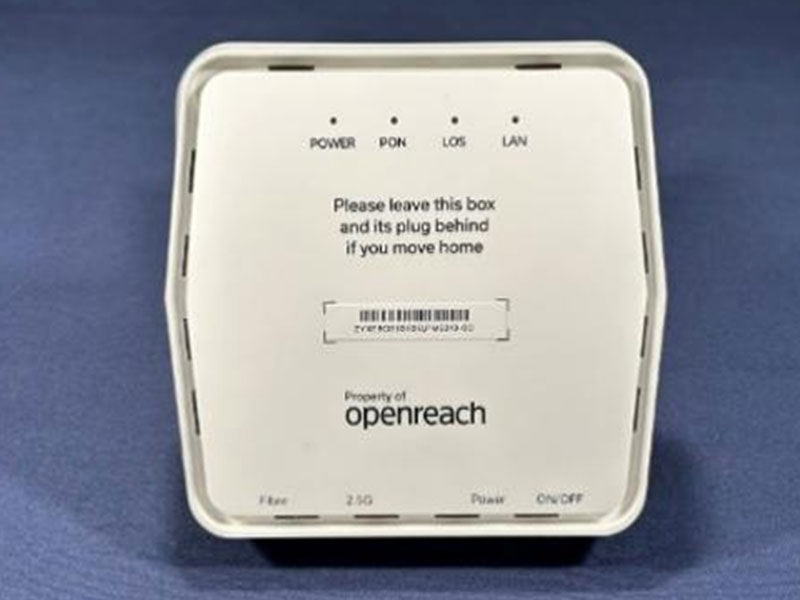
| Light | Expected on a working connection | If different |
|---|---|---|
| Power | On, normally green | Check its original power supply is connected and the socket switched on. |
| PON | Steady green | Off or persistently flashing: report the fibre connection to us. |
| LOS | Off | Red or flashing red indicates loss of optical signal. Contact us; this is not a Wi-Fi setting. |
| LAN / Data | Lit or blinking when linked to the powered router | Check the Ethernet lead to the router’s configured WAN port is securely seated. |
Steady green PON with LOS off is a good fibre-link indication. If those are correct, continue to the router. ONT designs vary; some use an Alarm label instead.
2. TP-Link router: power, internet and Wi-Fi
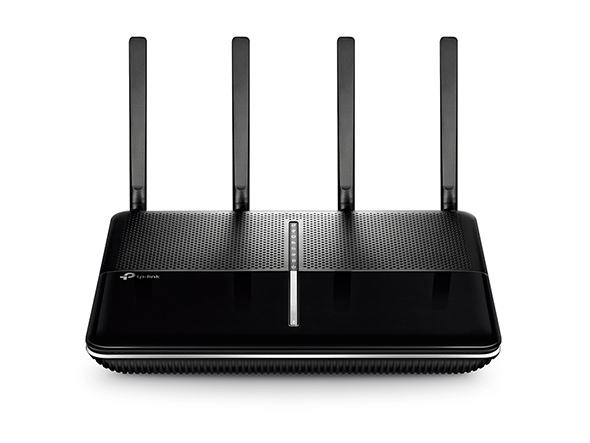
| Indicator | What to look for on this model |
|---|---|
| Power | Steady on after startup. Flashing can mean startup or an update; do not interrupt an update. |
| Internet / globe | White means internet service is available. Orange means the connection exists but internet service is unavailable. Off needs investigation unless bridge mode explains it. |
| DSL / sync | For a DSL telephone-line connection: steady on means synchronised; flashing means trying to synchronise. Off indicates no DSL sync. |
| Wi-Fi 2.4 / 5 GHz | On for each wireless band you use. Off can simply mean that band is disabled. Wi-Fi on does not prove internet access. |
Using an ONT? In Ethernet WAN/router mode, the DSL socket is not your incoming connection, so an unlit DSL/sync light is expected. Follow the ONT-to-WAN Ethernet cable instead. WPS and USB do not need to be lit. LED night mode can hide indicators even while the router works.
3. UniFi USG Pro: system and network links
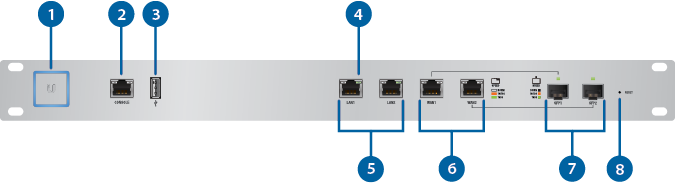
| Check | Expected / meaning |
|---|---|
| 1 · System LED | Steady blue means adopted and operating normally. Steady white means ready for adoption. Flashing white can indicate booting; rapid white/blue can indicate an update. |
| 4 & 6 · Used WAN link | The port connected to your ONT/modem should show a link. Green = 1 Gbps; amber = 10/100 Mbps. Blinking indicates activity. Amber alone is not a fault. |
| 4 & 5 · Used LAN link | Expect a link to the connected switch or device. Dark on a used port means no link: check the connected equipment and cable. |
| 7 · SFP alternative | A fitted SFP uses the corresponding WAN connection instead of that RJ45 WAN port. Do not move cables between ports to make every light illuminate. |
This gateway has no built-in Wi-Fi radio or DSL sync light. Check the separate Wi-Fi access points or modem where fitted. A blue system LED and active WAN link do not by themselves prove the internet is reachable.
4. Confirm access, then tell us what you see
- From a device connected to this router, try two different websites. On a phone, turn mobile data off for this check so it does not hide a broadband outage.
- If possible, try another device and a wired connection. One affected device suggests a different problem from every device losing access.
- If service is still unavailable, send us the site, router model, when it stopped, which devices are affected and a photo or description of the ONT/router lights.
Leave the thin fibre lead connected and do not press a Reset button. For a business network, contact us before restarting shared equipment so we can account for phones and other services.
3CX · Personal contacts · 2 minute readHow to add personal contacts in 3CX
Use your Personal phonebook for contacts you need individually. This keeps them separate from your organisation’s shared Company directory.
- Open your 3CX Web Client. Use the address provided by your organisation and sign in to your own extension.
- Select Contacts. Use the phonebook filter to choose Personal. Search first to avoid creating a duplicate.
- Choose + / Add contact. Enter the person’s name and telephone number, plus any useful company or email details.
- Check the destination. Keep the contact as Personal; do not select a shared Company or Department destination for an individual-only entry.
- Save and check. Search for the name in the Personal view, open the record and check the saved number before calling.
Your 3CX Personal phonebook is different from an address book saved locally on a desk phone or mobile. Button labels vary between client versions.
3CX · Company contacts · 2 minute readHow to add company-wide contacts in 3CX
Use the Company phonebook for business contacts that colleagues should be able to find. Your extension needs permission to create or manage shared entries.
- Open Contacts in the 3CX Web Client. Select Company in the phonebook filter and search for the person or business first.
- Choose + / Add contact. Enter a clear name, company and telephone number.
- Select the shared destination. Choose Company, or the option to add the entry to the company phonebook. Check this before saving.
- Save and verify. Find the record in the Company view. Ask an authorised colleague to check that they can find it too.
No Company option? Ask your 3CX administrator or Customer First to check your permissions and system setup. A Department phonebook has a narrower scope; on multi-company systems it can represent your company’s directory. Do not substitute a Personal entry if the aim is to share it.
For a larger list, our team can help with the administrator’s CSV import or supported Microsoft 365/CRM contact integration.
3CX · Mobile app · 3 minute readPersonal and company contacts in the 3CX mobile app
Use Contacts in the 3CX app to find business numbers while away from your desk. Personal and Company refer to 3CX phonebooks; your phone’s own Android/iOS address book is a separate source.
Find and call a contact
- Open the 3CX app and check that it is connected to your work extension.
- Open Contacts. Use the available filter to select Personal or Company, then search for the name.
- Open the contact and choose the required number to call through 3CX.
Add a personal contact
- In the app’s Contacts view, use the + / Add contact control available in your version.
- Enter the name and number. Keep the destination as Personal, leaving shared Company or Department options unselected.
- Save, then search in the Personal filter to check the entry.
Add a company contact
- Start a new contact and enter the business details.
- Select the Company destination or company-phonebook checkbox, if your extension is allowed to manage it.
- Save and check the Company view. If that choice is missing, ask us to check permissions or add the record through the Web Client.
Android shortcut: during a call with an unsaved number, the app can show Add Contact on the dialler. It opens a form with the number already filled in. Add a name, choose the correct phonebook and save. Only select Microsoft 365 or CRM destinations if you intend to save there and those integrations are configured.
iPhone and Android differences: labels and available destinations depend on app and server versions. Department directories may also appear. If the add control or destination is unavailable, use the Web Client guide above or contact our team. Device contact-access permission controls access to the phone’s local contacts; it does not grant rights to edit the shared 3CX directory.
Support · 2 minute readHow to log a support ticket
Use our customer support portal to tell us what you need and keep your request in one place.
- Open the support portal. Select the Support button at the top of the website, or use our Zoho Desk customer portal.
- Follow the portal prompts. Sign in if requested and choose the option to submit a ticket or support request.
- Give the request a clear subject. For example: “Office Wi-Fi not connecting” or “Help with my 3CX phone”.
- Explain what happened. Include your company, affected device or service, when the issue started and any error message. Add a useful screenshot if the portal offers an attachment option.
- Submit and keep the reference. Use the ticket reference when following up. You can return to the portal to view your requests.
Accounts · 1 minute readHow to request an invoice or check a balance
Send an accounts enquiry using the short form on our homepage.
- Open the homepage search. Type “request an invoice”, “statement” or “check my balance”.
- Select “Invoices & account balances”. The enquiry form opens in a pop-up.
- Enter your details. Add your name, company or account name, email address and a short subject.
- Tell us what you need. Include the invoice number or account reference if you have it, then select “Send enquiry”. Your enquiry is directed to servicedesk@cfsolutions.co.uk.
This requests help from our team; the website does not display live account balances. Please do not include payment card details.
Software · 1 minute readHow to find the right software download
Our downloads page brings commonly used supplier links together.
- Open Software downloads. Use the Downloads link in the website navigation or footer.
- Choose the product. Find TeamViewer, RealVNC, Malwarebytes, Ricoh drivers, Microsoft Office, Hikvision iVMS, Paxton or 3CX.
- Continue to the official supplier website. Choose the version for your device and operating system. For printer drivers, check your printer’s model number.
- Follow the supplier instructions. Some software needs an account, licence or details provided by our team. If you are unsure which package you need, ask us before installing.
For remote support software, share session details only with the support person you are expecting to help you.
Troubleshooting · 2 minute readHow to give us useful information about a problem
A few clear details help us understand the issue and get to the right next step.
- Tell us what is affected. Name the computer, phone, Wi-Fi network, application or site. Say whether one person or several people are affected.
- Describe what you expected and what happened. Copy the exact error message where possible.
- Note when it started. Tell us if it is constant or intermittent and whether anything changed just before the issue.
- Include what you have already tried. This helps avoid repeating the same steps. A screenshot can be useful; check it for private information before sharing.
- Explain the business impact. For example, whether you cannot take calls, use a key system or connect a whole office.
Do not include passwords in a ticket. If equipment controls doors, security systems or shared services, contact us before changing settings or disconnecting it.